If you use a raspberry pi for projects which is shipped with a 8GB SDCard it is very useful to know basics about the root, file and recovery system on the preinstalled card.
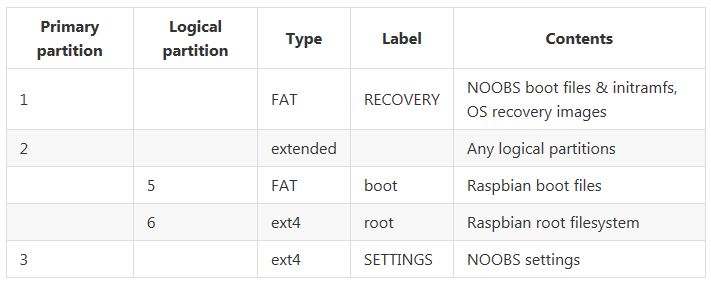
- Major Basics about the Partitioning you find here
- To save time the raspberry pi offers possibility to run a Full Backup if the pi is ONLINE! Cause the OS is running from RAM like Live Mode!
- For Backup you need a USB to SDCard Reader with Adaptor Micro SD to SD, and a second SDCard i use 16GB Class 10
- Plugin the new SDCard into the Adaptor and into the Reader and connect to the raspi USB Hub
- Open Terminal and run Full Backup $sudo dd if=/dev/mmcblk0 of=/dev/sda bs=1M
- Take a Cup of Coffee and wait..~17000sec/8GB after finish plug off the SDcard Adaptor and keep save
- If you want to migrate from 8GB to 16Gb Card do a dd-dump and replace the Card inside the pi, after sucessful boot on the 16GB Card, you can allocate a fresh 8gb primary partition with $sudo fdisk /dev/mmcblk0 and do $sudo mkfs.ext4 /dev/mmcblk4 (cause noobs place it into 4!!)
Noobs Partition Layout:

Remark:
- A firmware upgrade will override the recovery.img on partition_1 too
- Prefer a full recovery reset after a raspian version upgrade! (wheezy > jessie)
- A Kernel Only upgrade can be runned with $sudo rpi-update NO OS UPDATE!
- Backup can be started over SSH Login to, here you need a program called “tmux” to hold the process online on disconnect!